Managing Localist Events
Guidelines for Localist Admins
Managing the DGSOM events calendar is easier than ever with the admin dashboard. Now, you can manage all events and settings in one place.
Roles
There are four frequently used roles in the DGSOM events calendar:
- Group Officers can manage their group and department details and send messages to followers directly from their group’s page.
- Event Admins can publish new events without review, edit events, and approve or reject events submitted by regular users from the admin view.
- Regular users can create, search and register for events and manage their events calendar.
- Students and staff leaders may have their user role elevated to ‘trusted’. Trusted users can publish new public events without the need for review.
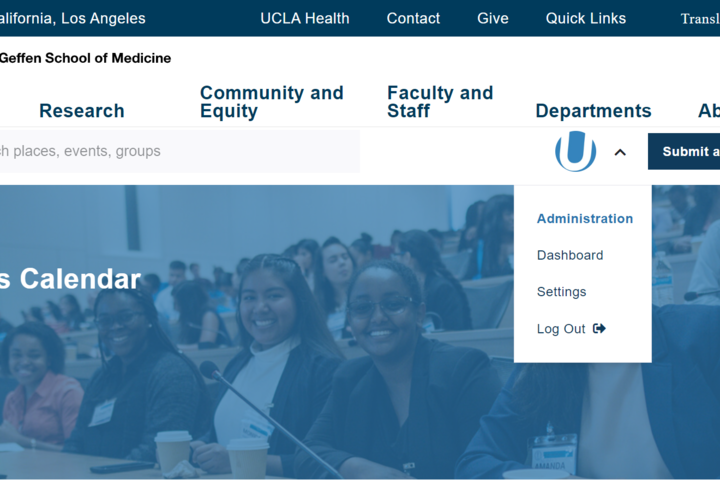
Logging into your Admin Dashboard
- Open the DGSOM Event Calendar.
- Click the Log In button in the top right corner.
- Enter your Mednet credentials to Log in.
-
Click Administration from the profile menu.
Managing Events
Virtual Events: It is important to set up your Zoom meetings in a way that users are expecting and that allows you to easily manage your attendees automatically.
- Sign in to the Zoom web portal.
- In the navigation menu, click Meetings.
- Click Schedule a Meeting or edit an existing meeting.
- In the Registration section, make sure to select the Required check box.
- After scheduling the meeting, the Registration and Branding tabs will appear.
- Manage attendees: Click View to see a list of people who have registered for the meeting. Clicking on the registrant's name will provide additional info about that person.
Learn more about Zoom registration
In-person Events: Visit the UCLA IT Health registration page.
From the admin dashboard, publish events without review.
- Click Create an Event in the top right corner.
- Fill out the Add the Event form.
-
Event Details: Add your event title and a short description of your event that tells your audience why they should atten
-
Schedule: Add the date and time of your event.
-
As soon as you enter a valid start date, you will see the Summary updated to reflect the field data, and the Add Above to Schedule button will be activated.
-
If your event is a one-time event, you can click Add Above to Schedule.
-
If your event is part of a recurring series of events, use the Repeating drop-down to create your custom schedule. Once you click Add Above to Schedule, you can add or remove dates to further customize your event schedule.
-
-
Location: Select whether the experience is in-person, virtual, or hybrid. If your event is in-person or hybrid, tag the Place.
-
Photo: Upload a photo or choose an image from our preset library. Avoid using text-heavy graphics.
-
Classifications: Make sure to select relevant and specific filters including your Department/Group.
-
Ticket and Registration tab: Deselect Use Localist Registration and add the Registration URL.
-
Once you've completed the form, click Save Changes and view the event to make sure everything looks good.
From your Admin Dashboard, navigate to Events > Add Conference.
Basic Information
Start by filling out the basic Conference Details:
- Name
- Start date
- End date
Conference Details
After saving your basic info, the rest of the submission form will be displayed below. You will continue to fill out the event details just as you would for a single or recurring event (see directions above).
Do not include agenda information in the conference details. You can add an agenda as a session.
Adding Sessions
After saving the main details of the Conference, select +Add Session above the Basic Info section. From here, you will complete the submission form once again, but the details will be unique to the session. To simplify the process, you can add each day of the conference as a session including an agenda.
Adding Speakers
You can add Speakers on a Conference level and Session level. You will find the Speakers field alongside your Classification options:
![]()
Speakers do not need to be added to the platform before assigning them to a Conference or Session. If you would like to complete the speaker’s biographical information, navigate to Classifications > Speakers > select the speaker’s name and edit accordingly.
New event requests are sent to the event admin queue for review and approval. From the admin dashboard, the event admin will review the event and either approve or reject it. If approved, the event will be posted to the event calendar and event widgets across the website. If rejected, the event admin will follow up with the user to request further details.
- From the Admin Dashboard, navigate to Events > Pending to review events in your pending queue.
- Event Details: If needed, move the date, location, and registration information from the description to the designated section.
- Schedule: Make sure all dates are included if the event is recurring.
- Location: Make sure the Experience is categorized correctly and Event Place is tagged if an in-person event is located in one of our Places.
- Photo: Remove text-heavy images and flyers. If the default image does not accurately depict the event, you can request a new image from the submitter by Rejecting the event (see below).
- Classifications: Make sure the event has the correct filters applied.
- Tickets and Registration Tab: For virtual events, check for a Zoom registration link.
- Click Approve or Reject. If you click Reject, a message form pops up to explain to the submitter why their event was rejected. Once they make the necessary changes, the event will return to the pending queue for review.
Embedding Localist
Embed events anywhere on the web with our Widget builder.
- Choose a template
- Set the number of results. We recommend three to six events.
- Choose your group(s), department(s), places, event type, topic, and/or target audience.
- Generate embed code and add the widget to your website source code.
Grid - Image Cards with Descriptions
Grid - Image Cards no Descriptions
For Groups New to Localist
Is your Group looking to highlight your events across the DGSOM ecosystem? Then Localist is right for you. We can help you highlight your events on your website's pages and give you greater exposure to the right audience. Once you are set up in Localist, your events can be found on the DGSOM All Events page.
Some key highlights are:
- Individuals can filter events by category.
- Events update automatically on your website.
- Create recurring events easily.
- Email upcoming events.
Take advantage of Localist by completing this form. We will set up some time to discuss the opportunities further.
Learn More About Localist
- The Localist Knowledge Base
- How to add every kind of event
- 12 things to remember when adding events
- Localist Glossary
- FAQ's - Part 1, 2, 3 & 4
- The Library - Monthly publication that includes tips, tricks, how-to’s, and more